

 Terra Pulse Technical Team
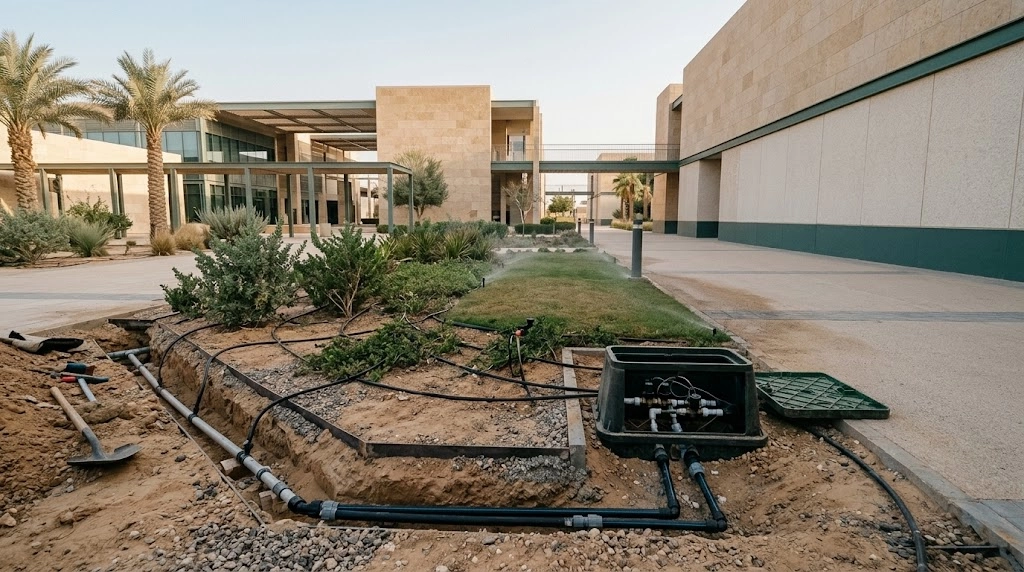
The guide covers landscaped grounds at facilities and development sites. The worked examples use assumed values to demonstrate the calculations. Detailed design uses measured site conditions, manufacturer data and project requirements. Terra Pulse landscaping and irrigation systems services.
What is irrigation system design?
Distributing water according to plant needs and site conditions
Irrigation system design determines how water reaches planted areas at the required volumes, flow rates and pressures. It uses site data to divide the landscape into zones and select pipes, outlets, controls and supply protection. The design also defines how the system will operate, be tested and be maintained.
Organise the work into eight stages.
- Survey the site, planted areas, levels and existing utilities.
- Measure supply flow and pressure and review water quality.
- Calculate water demand and group the site into compatible irrigation zones.
- Select the irrigation method and outlets for each zone.
- Calculate pipe sizes and pressure losses, then select operating and protection components.
- Prepare drawings, specifications, quantities and acceptance criteria.
- Coordinate installation and inspect concealed works before closing them up.
- Test the system, adjust its operation and hand over records and drawings.
Review each stage against the earlier decisions. If the zones exceed available flow or the permitted watering window, revisit the allocation of loads or consider supply and storage arrangements before approving the layout.
Why does irrigation performance depend on the design?
Water use, day-to-day operation and maintenance access
Design decisions determine how evenly water reaches the plants and how easily the facilities team can inspect or adjust the system after backfilling. Weak discharge at the end of a line may appear to be a scheduling problem. Check pipe sizing, losses and the combined demand of the zones running at that time before changing the programme.
- Water use. Define the area to be wetted, application rate and schedule to limit water reaching hard surfaces or passing below the root zone.
- Operation. Match each zone’s flow and pressure requirements to the watering window and the zones permitted to run together.
- Maintenance. Position isolation valves, flushing points and measuring points where the team can reach them and limit the area taken out of service.
Before procurement, check the design-day demand, the highest zone and a maintenance isolation scenario. Record the supply conditions, expected demand and operating limits in the design basis, then update it when planting or routes change.
What site information is needed for irrigation system design?
Areas, levels, drawings and existing utilities
Start with a current plan showing project limits, planting areas, ground levels and supply points. On an existing site, check the drawing against site conditions before relying on lengths or connection points. A proposed route may pass beneath an occupied walkway or cross a buried service.
- Survey and levels. Record actual areas, bed slopes and elevation differences between the connection and outlets.
- Planting. Record species, quantities, planting density and current or planned phases.
- Utilities. Locate water, power and drainage connections, buried services and crossings.
- Site use. Map pedestrian and vehicle movements, permitted operating hours and surfaces sensitive to overspray.
- Access. Identify reachable positions for valves, filters and flushing points.
Record each input’s source and date. Mark unverified levels or buried routes for confirmation before excavation. Add numbered photographs of connections and areas that affect routing or the choice of irrigation method.
How does planting affect irrigation requirements?
Different needs for trees, shrubs and turf
Water requirements vary with species, root development, planting density, exposure and establishment. A newly planted tree needs water distributed differently as its root zone expands. A continuous turf area needs an application rate that stays reasonably uniform across the zone.
- Trees. Plan water delivery around the root zone and review emitter position and quantity as the tree grows.
- Shrubs. Account for spacing, whether wetted areas overlap where needed, and differences in sun exposure.
- Turf. Check distribution at edges and whether the application rate is compatible with soil infiltration.
- New planting. Prepare an establishment schedule and adjust it using site observations and measurements.
Different plants can share a zone when their water needs, application method and hydraulic requirements are compatible. Separate groups when they require materially different application rates, run times or frequencies. Keep a planting schedule that connects each species or planting group to its irrigation method and zone number.
How do soil and drainage affect the design?
Infiltration, water retention and ponding risk
Soil affects how quickly water enters, how far it spreads and how long it remains available to roots. Water may travel quickly through a coarse soil profile, while a compacted surface may pond if irrigation exceeds its infiltration rate. Examine the actual root-zone profile, including fill or compacted layers that can restrict drainage.
- Measure infiltration or review suitable tests at points representing different site conditions.
- Note runoff routes and ponding points, especially at slopes and edges.
- Observe the width and depth of wetting when selecting dripline spacing and emitter flow.
- Consider shorter watering cycles with soak intervals where they can reduce runoff.
If a bed remains wet after reducing the dose, investigate drainage, compacted layers and leaks before adjusting the schedule again. Use observations from several representative areas to account for variation across the landscape.
How do you assess the water supply and its quality?
Flow, operating pressure, salinity, particles and permitted use
Measure supply flow and pressure together during operation, then check availability and water quality. Static pressure with outlets closed describes a different condition from pressure while the zone is drawing water. Record measurement location, time, level and other demand on the supply. Repeat the measurement where conditions vary.
- Supply. Establish available flow at the required pressure, supply hours and usable storage where provided.
- Quality. Request appropriate analysis, including electrical conductivity as an indicator of salinity, relevant ions, and turbidity or suspended solids where relevant.
- Operation. Review the potential for clogging, deposits and impacts on plants and soil. Specify filtration and flushing accordingly.
Assess water suitability alongside plant tolerance, soil and drainage. Some cases warrant a sodium adsorption ratio assessment and other tests. For a proposed treated-water supply, confirm applicable quality, permitted uses and application methods with the relevant authority. The official and technical references appear at the end of the article.
How do you calculate irrigation water requirements?
Climate, planting, area, application efficiency and seasonal change
Start with reference evapotranspiration (ET₀) for the design period and apply a coefficient suited to the plants or landscape under the selected method. Account for effective rainfall and available soil moisture when estimating net demand. Divide net demand by the assumed application efficiency to estimate gross water to apply. FAO guidance explains the reference evapotranspiration and crop coefficient method. Landscape planting requires coefficients suited to the site and plant mix.
Volume conversion. One millimetre of water over one square metre equals one litre. Multiply water depth in millimetres by area in square metres to calculate litres.
| Input or result | Calculation or value |
|---|---|
| Area and reference evapotranspiration | 500 m² and 6 mm/day |
| Net depth | 6 × 0.50 = 3 mm/day, assuming no effective rain or contribution from stored soil moisture |
| Net volume | 3 × 500 = 1,500 litres/day |
| Gross volume to apply | 1,500 ÷ 0.80 = 1,875 litres/day at an assumed 80% application efficiency |
| Equivalent run time | 1,875 ÷ 1,500 = 1.25 hours, or 75 minutes, at an operating zone flow of 1.5 m³/h |
Daily water volume and operating flow rate answer different questions. Use the volume to estimate water demand and the flow rate to check supply and pipe capacity. Split run time into cycles when soil conditions call for it, then verify the programme in operation. The coefficients above are illustrative. Evaluate leaching needs and drainage separately where salinity management requires them.
How do you divide a site into irrigation zones?
Grouping areas with compatible water needs and operating conditions
An irrigation zone groups outlets typically served by one control valve and operated under similar conditions and schedules. Start with plant needs, then check available supply flow, pressure, elevation and routes. Two similar planting beds may require separate valves if their elevation or pipe lengths create significant differences in outlet pressure.
- Separate areas with different application methods, operating pressures or application rates.
- Consider sun, shade, wind and slope when grouping areas.
- Add the outlet flows at their design operating conditions to calculate zone flow.
- Check the combined load of zones permitted to operate together and the total time available for watering.
Give each zone the same identifier on the drawing, valve schedule and controller. Record its area, application method, flow, pressure and planned run time. If sequential operation exceeds the watering window, model permissible overlaps or revisit the zone layout and supply before installation.
When should you use drip or sprinkler irrigation?
Comparing suitability, distribution and operating constraints
Drip irrigation can suit planting that benefits from localised water delivery near the root zone, such as many shrub beds and rows of trees. Sprinkler irrigation can suit continuous planted surfaces that need even coverage, where spacing, boundaries and wind effects can be managed. Use site conditions and outlet performance data to confirm the choice.
| Consideration | Drip irrigation | Sprinkler irrigation |
|---|---|---|
| Water delivery | Local application assessed through wetting pattern and depth | Surface coverage assessed through overlap and distribution uniformity |
| Typical constraints | Emitter clogging and pressure variation along lines | Wind, overspray and application rate |
| Selection checks | Spacing, flow, filtration, pressure regulation and flushing | Nozzles, spacing, spray arcs, throw and operating pressure |
For drip, connect emitter placement to observed wetting and root development. For sprinklers, check overlap and edges against manufacturer data and wind exposure. Separate control of each method allows the operating pressure and run time to suit each zone.
How do you size and route irrigation pipes?
Design flow, hydraulic calculations and access
Size each pipe section using its design flow, internal diameter, material, length, allowable pressure loss and installation conditions. Calculate the mainline load from the zones that can run together. Calculate each branch load from the outlets it serves downstream. The required pipe size may change as flow reduces along the route.
- Draw the mainlines and branches, identifying valves, connections and section lengths.
- Check velocity and friction losses using an appropriate hydraulic method and actual pipe data.
- Review pressure class, temperature, burial conditions, external loads and transient pressures as applicable.
- Coordinate sleeves and crossings with paths and utilities, and keep valves accessible.
A shorter route may require disruptive paving work or make valves harder to reach. Compare routes on pressure loss, constructability and access. Record pipe sizes, pressure classes and isolation points, and recalculate after changes to length, outlets or operating sequences.
How do you check operating pressure and system losses?
Verifying conditions at critical outlets
Start with the available supply pressure at design flow. Account for losses through pipes, fittings and equipment, and for elevation change between the supply and outlet. The critical path is the one with the smallest pressure margin against its outlet requirement. It may serve the highest zone or follow the route with the greatest resistance. Also check the highest pressures that low or nearby outlets could experience.
Worked example at 1.5 m³/h. Assume 3.00 bar supply pressure, 0.55 bar lost through pipes and fittings, and 0.35 bar lost through equipment. An outlet four metres above the measurement point adds an elevation allowance of about 0.39 bar. The remaining pressure is approximately 3.00 − 0.55 − 0.35 − 0.39 = 1.71 bar, neglecting the difference in velocity head for this example.
Compare that result with the outlet’s manufacturer-specified operating range. Check how supply variation, filter fouling and different zone combinations affect the margin. When testing on site, record flow and valve positions with pressure readings so the measurements can be compared with the design case.
How do you select irrigation pumps, filters and valves?
Matching equipment to water quality, flow and pressure
Select irrigation system components for the expected water quality and operating conditions. Where a pump is needed, establish the required flow and total head the pump must add. Account for suction conditions, elevation, system losses and any available inlet pressure that applies to the supply arrangement. Review the duty point on the pump curve and check the expected operating range against the system.
- Pump. Review different flow conditions, efficiency, suction requirements, protection against dry running and the control method.
- Filter. Match filtration to the type of particles and the outlet requirements. Check rated flow, clean and dirty pressure losses and how the filter will be cleaned.
- Valves. Define the purpose of each valve, such as isolation, zone control or pressure regulation. Check its flow range, pressure loss and installation requirements.
- Measurement. Specify flow meters and locations for pressure gauges or test points.
Compare equipment using actual operating conditions. Motor power alone gives limited information about whether a pump meets the required duty. Ordinary filtration addresses suspended material. Assess dissolved salts separately and record equipment selection data and access requirements in the design file.
What do controllers and sensors do?
Scheduling, moisture monitoring and adjustments
Automatic irrigation systems connect zones to compatible valves and a controller. Set run times and frequency according to plant demand and application rate. Review programme start times to prevent unintended repeat cycles. Check simultaneous operation against the supply capacity before allowing schedules to overlap.
- Controller. Check station count, expansion capacity and compatibility with valves and measuring devices.
- Soil moisture sensor. Choose a representative location and depth in the root zone. Set it using device instructions and site measurements.
- Weather data. Use suitable local data to adjust seasonal schedules where the controller supports it.
- Flow monitoring. Record baseline flow for each zone and set alerts against its expected range and operating behaviour.
Test valve opening and closing, sensor response and recovery after power or communication loss where applicable. Record station names, start times, manual operating instructions and access permissions. Pair automation with a hydraulically balanced design so the facilities team can check and adjust schedules after handover.
How do you protect the water supply from backflow?
Choosing protection for the supply and applicable requirements
Assess supply protection at the irrigation connection. If supply pressure drops, backsiphonage can draw water from the irrigation system towards the supply. If irrigation-side pressure exceeds supply pressure, backpressure can also cause reverse flow. A qualified specialist evaluates the hazard, connection and possible cross-connections, then selects protection under the applicable code and water supplier requirements.
- Identify each source and connection and distinguish potable and non-potable lines on the drawings.
- Review suitable separation or approved backflow protection for the hazard, pressure conditions and use.
- Include pressure loss through the protection assembly in the calculations. Allow for access, inspection and drainage where the assembly requires them.
- Record device type, location and required tests in the connection and acceptance specifications.
For sites in Saudi Arabia, consult the applicable Saudi Plumbing Code provisions and the water supplier. Where a treated supply is proposed, confirm its permitted use and the suitability of the application method before approving the drawings. Official and technical references appear below.
What should the drawings and bill of quantities include?
Zones, routes, equipment, details and specifications
Irrigation system design documents connect hydraulic calculations to installation and acceptance. Drawings show where components go and which zones they serve. The bill of quantities defines the items, units, specifications and supply and installation scope. Review the documents together to identify missing items and avoid double counting.
| Deliverable | Contents |
|---|---|
| Layout drawings | Zone boundaries, routes, pipe sizes, outlets, valves, isolation and measurement points |
| Calculations and zone schedule | Flow, pressure, losses, operating sequence and selected equipment data |
| Details and specifications | Crossings, burial, connections, valve boxes, controls, protection and inspection criteria |
| Bill of quantities | Lengths, quantities, civil and electrical works, testing and included handover deliverables |
Use the same zone identifiers in drawings, calculations and controller records. Define responsibility for power, water connections, reinstatement and handover documents. Check any proposed equipment substitution against hydraulic requirements and project specifications before approval.
What are the stages of irrigation system installation?
Coordination, excavation, assembly and inspection before covering
Set out pipe routes, connections and valves from the approved drawings. Coordinate them with planting, paving and existing utilities. At an operating facility, agree work areas, access restrictions and temporary water supply arrangements where the project needs them.
- Preparation. Verify buried services and approve crossings, materials, excavation arrangements and the inspection plan.
- Installation. Assemble pipes, fittings, sleeves, valve boxes and controls to the approved specifications and instructions.
- Concealed works inspection. Check routes, levels and connections. Photograph and record deviations before backfilling or reinstating surfaces.
- Testing and flushing. Follow the approved sequence and procedures for the pipe type. Isolate components unable to withstand the test pressure, then install or adjust outlets as required by the commissioning plan.
The project inspection plan determines when tests take place and how pipes are restrained during them. If site conditions require a change in route or diameter, review pressure losses and clashes, obtain approval and update the as-built drawing. The inspection record should allow the team to locate buried work after handover.
How do you test and hand over the irrigation system?
Leak checks, operating pressure, distribution, controls and as-built records
Check installation integrity first, then test each zone in operation. Use the project specification and the pipe and component requirements to determine line test pressure, duration, method and acceptance criteria. Record readings, test conditions and results so the receiving team can verify performance.
- Pipework integrity. Check for leaks, record test results and confirm that the lines were flushed according to the plan.
- Hydraulic performance. Compare zone flow, pressure and readings at representative outlets with the design and outlet operating ranges.
- Distribution. Use catch containers to measure sprinkler distribution where appropriate. For drip, check representative emitter flows and the resulting wetting pattern.
- Controls. Run stations in sequence and test sensors, alarms and the proposed seasonal programme.
Hand over as-built drawings, valve and station schedules, baseline measurements, test records and operating and maintenance instructions. Recheck corrective work before closing outstanding items. For faults that develop during operation, see the irrigation system maintenance guide.
What determines the cost of an irrigation system?
Site layout, irrigation method, supply, equipment and installation
Design and installation costs depend on planted area and layout, zone count, pipe lengths, irrigation methods, supply equipment, controls and excavation access. A small site with separated planting beds can require more crossings, pipework and valves than a larger connected area. Compare quotations using a common design and scope alongside any rate per square metre.
- Design. Include survey work, analyses, calculations, drawings, coordination and reviews.
- Equipment. Include pipes, outlets, valves, filtration and supply protection, with pumping and storage where needed.
- Installation. Cover excavation, backfill, crossings, electrical connections, surface reinstatement and testing.
- Operation. Consider water and energy use, filter cleaning, spares and routine visits.
Request quotations against the same drawings, quantities and specifications. Separate initial and operating costs. Identify which proposals include water treatment, reinstatement and operator training. Compare equipment access and maintenance needs alongside the purchase price, since these decisions affect the work required after handover.
Common mistakes in irrigation system design and installation
Incompatible zones, uneven pressure and poor maintenance access
Uneven growth, runoff across paving or recurring weak line ends can reveal a design or installation issue. Compare the symptom with measured performance and the drawings before changing components or run times. Adding time can overwater areas already receiving enough while the weak zone still has a pressure or clogging problem.
- Using static pressure alone. Measure pressure and flow together while water is being drawn.
- Combining incompatible areas. Check water demand, application rate and operating pressure for each group.
- Missing elevation or equipment losses. Check critical routes and minimum and maximum operating pressures.
- Omitting isolation and flushing points. Place them where the team can reach them without shutting down every zone.
- Accepting coverage by sight alone. Measure flow and pressure and use a suitable distribution test.
- Backfilling before documenting changes. Match photographs and measurements to pipe locations and as-built drawings.
Review these checks at design approval, before concealed work is covered and during commissioning. When a result falls outside the acceptance criteria, record its cause and corrective action, then measure again.
Frequently asked questions about irrigation system design
System selection, controls, water and cost
What are the main components of an irrigation system?
Typical components include a water connection, mainlines and branches, isolation and zone valves, and drip emitters or sprinklers. Depending on the site, the system may also need a pump or tank, filters, regulators, supply protection, a controller, sensors and measuring and flushing points.
What is the difference between drip and sprinkler irrigation?
Drip irrigation applies water locally near the root zone. Sprinklers distribute water across a planted surface through overlapping coverage. Choose based on plants, soil, area, wind and pressure. Check filtration and wetting patterns for drip, and distribution uniformity and boundaries for sprinklers.
How do you calculate how much water a site needs?
Estimate net water depth from evapotranspiration and an appropriate plant or landscape coefficient, allowing for effective rainfall and soil moisture as applicable. Multiply the depth in millimetres by the area in square metres to get litres. Adjust for application efficiency to estimate gross volume, then divide by zone flow in compatible units to calculate run time.
Can an irrigation system operate automatically?
Yes. Compatible valves and a controller set each zone’s run time, frequency and operating sequence. A system can also use soil moisture or flow sensors, or weather data. Test the programme, manual operation and sensor response and document the settings before handover.
How do you determine the required irrigation pump size?
Determine the duty point from the required flow and total head the pump must add, accounting for elevation, losses, outlet pressure and suction conditions. Select a pump from its performance curve, check the operating range and efficiency, then determine the motor rating required by the selected pump.
How does water salinity affect irrigation system design?
Salinity affects whether the water suits the plants and soil. It may require a review of plant selection, application method, drainage and leaching needs. Assess water analysis alongside site conditions, including the potential for deposits and clogging. Ordinary filters capture suspended particles. Dissolved salts require a separate assessment.
What tests are needed before accepting an irrigation system?
Typical checks include pipework integrity and leak testing to specification, flushing verification, zone pressure and flow measurements, sprinkler distribution or drip emitter and wetting checks, and valve, controller and sensor testing. Record acceptance results, corrective actions and as-built drawings.
What affects irrigation system design and installation costs?
Costs vary with planted area and layout, irrigation method, zone count, pipe lengths, supply equipment, filtration, controls, excavation, crossings and reinstatement. Compare offers on the same scope, including testing and handover, and identify operation and maintenance costs where relevant.
